Thursday, September 29, 2011

Home Tour: Taking Back Space After Separation

Since Ryan left, I've felt a tremendous urge to make our room more MY room! Of course, I have had very little money to do this, but I've made a few small changes. These few changes have given me some control over a space that could otherwise bring me down....way....way....down.

The first change I made didn't cost a cent. I filled the giant gap his clothes left in the closet {and filled up his empty bedside table drawers}. Don't be fooled. I couldn't bring myself to do this for weeks. Something about it just felt so final.

Eventually, I decided that I hated the reminder I got every time I opened the closet. I decided that it was making me feel worse and stuck and...depressed. THAT'S the day I did something about it! Of course, he had way more clothes than I did, so I just took the hangers and spread them out. Then, I divided my sweaters and sweatshirts into two groups and filled his former sweatshirt shelf with my sweaters. Lastly, the few shoes I had on the floor went into his shoe shelf, and I was finished. My stuff was spread out. I could breathe, and all that extra space reminded me that one day I'll have a full time job again. Then, I'll be able to finally afford to go shopping and fill it up {with some hot date clothes maybe...}. Hey, a girl's gotta dream!

The next change was easy too. I just took this pillow...


and turned it around...


I thought the little brown pillow added texture and a touch of femininity, so I threw it on there too. I'm still deciding if I like it or not. {$7 Walmart clearance find}

The next change was a bit out of necessity, for me anyway. Our old blue curtains were thin and see-through, and I didn't feel safe, since my bedroom faces the street...


Call me a baby, but I'm a scatty cat, and sleep is important to me! I replaced them with lined, chocolate brown curtains I found on a Target end cap for $12! I hung them up, but it didn't give the exact impact I wanted, and since they were a clearance item, I knew I better scoop them up. The next day, I went back and got another set!


Much better! I think it adds drama, a touch of romance, and they coordinate well with the little brown Walmart pillow. I also scored those two prints for $15 at T.J. Maxx. Don't you just love to turn a T.J. item over and see those little red clearance stickers?!

There's still some changes I'd like to make...


Even though I'm keeping my last name, that "A" just represents our marriage bed. Since it's most definitely not that anymore, leaving it there would be like a constant reminder of who used to share it with me. It just has to go...eventually...when I can afford a cool mirror big enough to cover it!

I also still have one of our wedding pictures framed on a bedside table...


I've taken up sleeping on his former side, so I don't wake up looking at it anymore, but I'll replace it as soon as I get around to printing one of Preston I like. Baby steps, people. Baby steps! {Notice that I still use Preston's baby monitor too, but I don't like it in plain view, so it gets hidden behind the display.} The frames and candle were originally from T.J. Maxx. The book was from a garage sale.

If you're going through a divorce, or have gone through one, what was one of the first things you did to take back your space?!

EDIT 10/3/11:

Since originally writing this post, I have replaced the wedding picture next to my bed!


I got lucky enough to stumble upon this GREETING CARD on clearance at Pier 1 Imports. It was just $1.98, and I simply cut it to fit! I am thrilled with the symbolic results, and it makes me smile every time I look at it!


Sunday, September 25, 2011

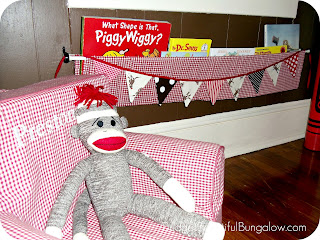
Preston's Toddler Room {DIY Wall Book Bin}

I've been so excited to share this post with you, so I'm glad you found us today! As many of you know, I have been working hard transforming Preston's Nursery into a "Big Boy" room. He is 19 months old and still in his crib, but his play has really evolved in recent months. I could tell he was growing bored with his set-up {and maybe I was too}, but I also sensed he was ready for something more exciting and age appropriate. The rest of the BIG reveal is coming soon {I promise}, but for right now...come on in and sit awhile. His DIY wall book bin is complete!


In early March of 2010, I saw this picture online...


I immediately saved the photo to my computer and put it away in my memory bank of "some day" tasks. Preston was less than a month old, and I really wasn't gung-ho on any major projects. Since then, I've seen it pop around Pinterest, but I honestly have no idea who's original idea this is or where I saw it {Project Nursery's gallery most likely}. If it was you (1) Job well done! (2) Please, let me know so I can give you credit! Correction: A fabulous reader gave me the link to the original nursery post! This wonderful idea was MB's!

So...how did I make this adorable little room moment?! I'll have to explain, because I didn't take any tutorial-type shots. I'm sorry, but be reassured that it wasn't too tricky or {most important} too expensive!!!!

It all began when I was trying to hem the red and white gingham curtains from his bedroom. I ended up cutting the wrong end off, so I had a small piece with the rod pocket. The curtains were ruined, since it was my final panel, and it would look different from the other three...I was mad. I got *a little* upset. I pouted. Then, a light bulb came on, and I remembered this project. The scrap fabric piece would be perfect, because I'd only have to sew a rod pocket into one end {I knew the project required two pockets for hanging}.

I went to the space I wanted it to go and measured. Then, I measured the width of the material. Again, the decor gods were looking out for me, because it was a PERFECT fit! I did an extreme happy dance. Then, when I recovered, I got to work sewing.

I didn't follow any sewing rules with this job. I pretended like I knew what I was doing and went with it. First, I grabbed one of his larger books and laid the material out length wise in front of me. I folded it in half {to create the pocket you see on the wall} and laid the book inside to ensure it would have enough material to support it. It did, and I moved on {with building excitement}.

Because I had a finished, store bought curtain, the sides were already hemmed. I just had to create one rod pocket at the opposite end. I folded the material over and allowed for a two inch pocket. I sewed it across and was done.

If you have a raw piece of material, I recommend measuring your space to see how wide you need the finished book bin to be and allow for two inches of edge seams {one on each side of the finished book pocket}. Then, I would hem the right and left edges. Next, I would fold each of the opposite ends over, pin and sew a two inch rod pocket at each end. To simplify it, looking at your finished rectangle of material and going clock-wise, you should have a pocket at twelve o'clock, a finished hem at three o'clock, another pocket at six and a hem at nine. Maybe, that made it more confusing?! Darn it! I knew I should have taken pictures!!!!

Ok. After that, I went to Lowe's and bought two of these wall mounting brackets.


They are in the curtain hardware section, come in black or silver finishes and are less than $5 a piece. I believe they're called cafe rod brackets. I also bought two skinny white tension rods {for less than $2 each}. I believe she used a wooden dowel in the original, but I knew that required cutting, so I kept things simple and used these. At first, I noticed a little bowing, but it doesn't bother me, and they seem to be holding up well. They've been up for two weeks or so and get daily use too! The last part can be the tricky part, but I did it by myself. Well, I did have a tiny helper who held my screwdriver and played around...


I just measured the finished pocket, allowed for some tension rod space and screwed the first bracket in. Make sure you remember to decide where you want the mounted pocket to fall on the wall. We have wide baseboards, and I knew I didn't want the finished wall pocket to cover any of those! Also, I used a screwdriver, because I don't have my own drill yet {fingers crossed, Santa}, but I definitely think a drill would have been better!

Finally, I used my laser level and screwed the second bracket into place. I opened the tension rods to their needed length, tightened the first ends of the rods into the bracket, slide the pocket on, tightened the second ends of the tension rods into the bracket and stood back!

Of course, I couldn't leave it at that though! I HAD to add this adorable miniature bunting from Etsy, but it added whimsy and interest and was the exact finishing touch it needed! Blue Moon Studios was a JOY to work with and did a fantastic job on it too! It was well worth the $15 {and extra wait to post this}!


Preston seems pretty happy with it too...


Other products seen:
Personalized Red Gingham Soft Chair-Pottery Barn Kids
Sock Monkey-Target Stores
Personalized Sock Monkey Tattoo {pictured on it's arm}-Etsy
White Stool-Target Stores
Giant Red Crayon Bank-Toys are Us
Sock Monkey Toddler Pillow-Carousel Designs {babybedding.com}

This post has been linked to At The Picket Fence: Inspiration Friday. Click the photo to join the FUN!

Saturday, September 24, 2011

Random Facts About Me

You've seen pictures of my {home}


and pictures of  my {son},


but you don't really KNOW me {us}...just yet!


1.) I'm a newly single mother {as of August 14th of this year}, and it's something I NEVER thought I'd be, but I'm recovering and making the best of our crappy circumstances. You can read more about that here.

2.) I. LOVE. Diet Coke. Period. It is my lifeline. It is my coffee. It is my...addiction.

3.) Green is my favorite color, but I'm trying to evolve, and yellow is quickly replacing it.

4.) I've never had a speeding ticket.

5.) I've never had a cavity.

6.) I went to school for early childhood education, and I have taught preschool and managed a performing arts daycare center.

7.) I'm NOT an animal lover. I try. I really do, but they just don't grow on me.

8.) I am self diagnosed with O.C.D. {probably where the animal thing comes into play-all THAT HAIR!} My friends had to use coasters {from Crate & Barrel of course} in my room, when I was a child. Ask them. It's true.

9.) I LOVE home decor, architecture and ANYTHING to do with houses. I search real estate listings all the time, not because I'm on the market, I just love seeing inside...I also LOVE driving past houses at night with open curtains. I look. I stare. I've been known to make the driver turn around, just so I can get a second look at a great room. I've ALWAYS been this way too. My mom tells stories of waking up at 3 am to find me rearranging my bedroom. When I was in first grade. Later, my bedroom became known as "Apartment 1A". I was, and still am, proud of that!

10.) I can go all day without turning the TV on and never even notice.

11.) I can drive someplace without turning the radio on and never even notice.

12.) I HATE to talk on the phone. I can leave my phone in my purse, car, etc all day and never even notice.

13.) I am sarcastic. It's my favorite sense of humor.

14.) I love 80's movies, and I can recite "almost" every line of Steel Magnolias. True story. I also miss the sitcoms of the 90's. In my opinion, Doogie Howser was the first blogger.

15.) Poor customer service is my BIGGEST pet peeve. I have no patience for it.

16.) I LOVE New York City and secretly wish I was Carrie Bradshaw. I've visited three times, and I immediately felt comfortable the first time. If I had a trillion dollars I could, and would, live there in a hot minute!

17.) I can dress my home, and could do an even better job if my budget was different, but I feel I can't dress myself to save my life. I see outfits I adore all the time, but I get overwhelmed in clothing stores. I hate to try clothes on, and I have to be in the mood for any of it, but I watch the Style Network constantly and love runway shows. None of that makes sense.

18.) I'm a BIG dork. I break out in random songs and dances constantly. I've been known to hump a counter, fridge door, whatever's around when a tune pops in my mind...

19.) I love teacher supply stores, stationary, craft stores...ALL of them. Sometimes I think I like the actual supplies more than I do the actual creating, but that's mostly a confidence thing.

20.) I LOVE, LOVE, LOVE Etsy, but my new Pinterest addiction is sort of taking up some of my prior Etsy time.

21.) I'm a night owl. Always have been. Getting worse with age and since motherhood.

22.) I love to write. It was my first real hobby, and my nickname growing up was Angela Lansbury. This was because my parents could constantly hear the tap, tap, tap of the keys on my typewriter coming from my room. I won my first writing award in second grade, and my dream {one of them} is to be a published author.

23.) I have very expensive taste but get a HUGE thrill from a bargain.

24.) I was born and raised in Michigan. We moved to Virginia almost three years ago, but I miss {home} every day...I'm just a northern girl at heart. Plus the shopping is SO much better there...

25.) Preston was born in Tennessee. This *sort of* bothers me. I wasn't joking when I asked Ryan to rush me to the Michigan boarder when my water broke...

26.) The fact that I *only* have an associates degree bugs me. Constantly. I plan on doing something about that very soon...

Alright. Enough about me. I want to know about YOU. Tell me one thing I don't already know. Ready. Set. Comment!

Friday, September 23, 2011

Before and After: Our New Dining Room Buffet

I don't have an ah-mazing post for you today...
just alittle before and after.
{BUT} the way I see it...that's totally acceptable,
because we can't all be
super hero crafters, decorators and DIYers every. single. day.
Can we?!

Alright. I was just having a little bit of fun experimenting. Now {with a huff and pretending to slowly walk back to work pouting} on to the subject at hand. For some time now, I have despised this itsy bitsy buffet table that sat in our dining room...


It's finish matched the rest of my decor, and I liked how it complimented my candle sconces {a trade I made with my mom for smaller ones I had}, but I've never been head over heels in love with this piece. Ever. From the day I bought it at Home Depot {who buys furniture there anyway} with it's matching lamps and who could say no set price, it's sort of taunted me. I sold the lamps years ago at a yard sale, but this just sort of stayed around-out of necessity mostly. I toyed with spray painting it. I sat and looked at it and looked some more. Then, sometimes I just ignored it {and kept it covered up with Etsy orders and projects}.

That all changed, the day my mom offered me her larger scale, black buffet table. My dad bought it for $45 six years ago from K-Mart. He beat it up with a chain, painted it red, then painted it black and distressed it with a sander. He was on his own DIY kick at the time. Candice Olson was his current design crush, and he went around the house painting, reupholstering foot stools, building wrapping paper dispensing wall units {a special request of mine} and constructing a HUGE entertainment center {that I drew the plans for}. I was proud of him, and although it was too big for their current home, and it didn't match my decor AT ALL, it still stung a little to think about what I had to do to it. Take one last look at his fab finish job...


Anyway, it had to be done, so I went to Walmart and bought four cans of spray paint {in Almond} and one $2.50 spray paint dispenser thing {not it's "official" name by the way}, because I'm getting tired of hand cramps from holding the nozzel down...


Notice that I didn't prime it. It's not that I'm lazy {although sometimes guilty of "project A.D.D."} and it's just that money is sometimes the deciding factor for me doing it right and good enough. Plus, I just told myself that with the black layer, I would be OK if it got dung up, scratched and dented. In fact, I'm hoping it will. Of course, I could eventually take a sander to it and distress it myself. I should have done it then, but my "project A.D.D." popped up again, and I just couldn't wait to get it into it's new home...

Ahhhh! MUCH better!

The hardware was a trip, THREE actually, to Home Depot. I'll spare you the details, but I finally got the knobs, and Preston gained an addiction to those ridiculously HUGE, orange truck shopping carts. Have you ever tried to maneuver those things around that store?! I still have A LOT of accessorizing to do, but I love my "almost" free new buffet! Keep on the look out for another update when it's all dressed to impress!

Note: I should also tell you that the table took one more can of spray paint {5 total}. When my dad dropped the finished piece off at my house, I realized it needed to be touched up in a few spots, but it's all good now!

This post has been linked to...


Thursday, September 22, 2011

A Paper Flower Tutorial {Fall Wreath}

Fall is my favorite time of year. It always has been. Always. The smell of apple cider, pumpkins, little yellow school buses back on the roads again, changing leaves, adorable and creative Halloween costumes, a special night each year where a child can be ANYTHING they want to be, breezes and cozy houses, and Sunday afternoons filled with a good LifeTime movie...you get the drift. This fall has snuck up on me in a crazy haze of uncharted territory, stress and anxiety. With divorce lawyer meetings and job hunting and worrying and hurting and worrying some more, it JUST occurred to me that fall's here, and I LOVE this time of year, so I'm going to do my very best to embrace it this year too. Darn it! Even if I have to slap myself happy! So....

I was recently inspired by a wreath I saw in this post by Sarah from Thrifty Decor Chick. Her flower wreath was adorable, and I knew I could probably pull some version of it off. She used felt, and that was my original intention too, but I went to my craft stash, and I wasn't inspired by any of my left over felt. Since there is practically no budget these days {and by practically I really mean none}, I decided to use pages from an old book I had on hand and make paper flowers! This suited my personal style better anyway. I'm kind of a paper/letters/words/quotes/anything literature sort of nerd...

Of course, I bought a grapevine wreath at Michael's {for just $2.50} about a week ago. I hung it up. Blank. And there it sat, until I worked up the nerve to actually attempt the flowers, but once I jumped in, I had NO idea what I was so paranoid about. They were super easy, and sort of addicting, to make! This is what my finished wreath looks like...


Some of the feedback on my Facebook page is that it's a little plain, and I thought so too at first. I toyed around with the idea of adding copper glitter to just the flowers, but then I decided that I like the neutral/natural look of it, and I might have to have it hang around for awhile, so I like it just the way it is. For now, anyway!

Ok. First things first. How do you make those adorable little flowers? Gather whatever medium you plan on making the flowers out of, a pen, a glass or cup, scissors and your hot glue gun. Then, using the cup, trace a circle on your material.


Click on the photo to enlarge


Next, cut it out. Then, cut a swirl around the paper {like you learned in first grade and thought was the coolest technique ever}. After that, start from the inside and wrap it around until you create a flower. You can adjust the size of your flower by how tight you wrap, so play with it and make a variety of sizes. Now, turn the flower over and give it a good dose of hot glue. Hold it together carefully until the glue dries enough to support the flower. Repeat until you have as many flowers as you want.


Click on the photo to enlarge

The last step is the fun part! Start hot gluing those puppies wherever you want on your wreath. As I got going, I realized I wanted something else on it too, so I dug out some burlap{ish} ribbon I had leftover from a project and played with it on the wreath. To give it interest, I decided to make loops and glue it down every inch or so. Then, I liked how the end of the ribbon was naturally curling, so I played with that and glued it in an interesting resting place. Lastly, I finished the ends of the ribbon off with my paper flowers in a random pattern.


The wreath went back up on the front door {a house original from 1941}, but I didn't hang it on my typical bronze wreath hook. I decided to hang it on a decorative hook that you'd most likely see in a mudroom or kitchen {or somewhere someone needed a hook}...


I bought the hook at Hobby Lobby about seven years ago {or more}, but I do have one that I painted robin's egg/light turquoise{ish}. It's available for sale in my Etsy shop.

Anyway, I liked making the flowers SO much that I decided to give the lonely little wreath hanging on our dining room mirror a face lift too...


I'd love to hear about your flower making shenanigans {or any other paper crafts you've LOVED doing}, so comment or leave a link to those posts below! Let me know if you're just as addicted to making them as I am or if you'll never be attempting this again...

This post has been linked to The Inspired Room's 2011 Fall Nesting Party! Click the picture to join the fun!


Wednesday, September 21, 2011

Country Living Inspired Funkins & Our Fall Mantel

I recently got this beauty in the mail and immediately opened it up. I HAD to know how they made the pumpkins on the front!


My mom came over the same night, magazine in hand, and said, "We have to make these!" I smiled and pulled my copy out and said, "I know!" The next night, we were at Michael's gathering supplies. (1) A few fake "funkins" that happened to be 50% off (2) scrapbook paper. I already had the rest of the supplies. (3) foam brushes (4) Mod Podge (5) Mod Podge Sealer (6) wax paper. Easy and cheap!

Monday, I arranged the "funkins" on our fall mantel to see where I wanted them...


They looked nice, but I knew it could still use a punch, so I was just as excited as ever to get started on our little project!

Last night, we got to work on my coffee table, so we could watch Teen Mom {I know. I know. I got sucked in two years ago, when I was 26 and pregnant, and I can't get out!}


The difficulty level for this project is easy, but I do recommend a decent chunk of time and a small amount of patience...

We started by laying down wax paper and filling a bowl with Mod Podge. Then, we cut our scrapbook paper into strips {smaller strips for the small pumpkins work best and 1-1.5" strips for the larger ones}. It took about two-three pieces of 12x12 paper for the small and 3-4 pieces for the larger pumpkins, so make sure you have enough of the SAME pattern! Then, we applied the Mod Podge on the paper strip and placed it on the pumpkin {starting from the stem and smoothing down}. Repeat. About 75 times {maybe a slight exaggeration}. Then, we coated each pumpkin with two coats of Mod Podge {allowing about an hour between each coat}. Today, I put them all outside and gave them two coats of Mod Podge Sealer {allowing at least 15 minutes between coats}. Note: We started with the smaller pumpkins, thinking it would be easier, but the larger ones were much easier and quicker!


My mom made two black and white ones, to match her decor {photo one}, and I made three pumpkins in shades of browns, khakis and a burnt orange {photo two}, but they even look great grouped together {photo three}!


Now, my fall mantel is complete, and I am beyond thrilled!


I already had most of the accessories, but I did get that little skull for $1.99 at Michael's and the two skeleton keys for $1 each there too {I just strung them on a piece of jute twine}. The three amber candle holders came from Target and were $1.99 each. Other recent finds include two milk glass vases for $3 each and my little owl for $.79 at a local consignment store. I just spray painted the owl!

I hope this has inspired you. Please, comment and leave a link to your blog post if you decide to make these "funkins" too or post a picture to our Facebook wall! Fall is finally here, ladies! Eeeekkk!

This post has been linked to The Inspired Room's 2011 Fall Nesting Party! Click the picture to join the fun!


This post is also linked to Finger Prints on the Fridge "Feature Yourself Friday".

This post is also linked to The Lettered Cottage "Autumn Link Party". Click the picture to join the fun!


Sunday, September 18, 2011

Our New Look

Change seems to be in the air all around me these days, and instead of despising it {as I usually do}, I've decided to embrace it! Since the day I started this blog, I've had bigger visions for it. While those visions will most likely evolve over time, I've recently taken a BIG step toward reaching some of them!

Jaimee of Bushel + Peck Paper has been a close colleague of mine for some time now. We've collaborated on quite a few projects, and she ALWAYS comes through for me. It's kind of like she reads my mind...


Her work is classic and clean but with such a modern twist, and I just ADORE it! She's the talent behind my new banner and blog button, and I couldn't be happier with the outcome! What do YOU think?!

While it is her passion and calling, there's more to Jaimee than Bushel + Peck Paper. She has a heart of gold and is constantly promoting her favorite people. One of those people happens to be her sister Kristin of Water Closet Soap {Jaimee did her logo too}! Jaimee's also the proud mommy to a very active little boy-Finn. She is extremely involved in all of his sports adventures and often volunteers at his school too...Wouldn't YOU love to have a child on her son's hockey team?! On top of THIS, she takes care of her home and even occasionally bakes! There's also the Facebook page, Blog Website, Etsy Shop, Twitter, Catch My Party and on and on and on....She's sort of Super Wife, and I'm so glad I know her!


Stop by and send Jaimee a little LOVE. You'll be glad you did...

Friday, September 16, 2011

Halloween {and a lack of progress}

You'll soon discover that Halloween is one of my favorite holidays! I've always found it kind of odd though, because I hate scary movies! Anyway, I don't claim to make sense. I'll even admit that deep, deep, deep down {in a hushed voice}, I'm kind of a BIG dork! The good news is that I'm totally comfortable with that little known fact.

Anyway, now that I went WAY off topic...what was I talking about again? Oh...HALLOWEEN! So, today was one of those rainy, gray, breezy, damp days that just felt like fall {and I enjoyed every second of it}! Naturally, it got me thinking about fall and Halloween decor and Preston's 2nd Halloween costume! Last year, I already had it all planned out and waiting in his closet by now. Heck. I even had time for a DIY photo shoot and sent out photo cards to our entire family.

This isn't the actual photo card I sent out. It's just a little Picnik project, but wasn't my little scarecrow a DOLL?!
This year, I've done....NOTHING, and I hate that feeling. It's only September, but I'm already freaking out that I'm running out of time. On top of that, with everything going on {and it's been pretty consuming}, I don't have a clue about what he should be this year. Not. A. Single. Idea. Everytime I get one, it's tossed out because of some potential costume malfunction and his age. {I fear a 20 month old might refuse to wear a gnome beard, and then the whole costume is just a red turtle neck and navy sweatpants. I don't think he'll be able to sit comfortably in the stroller in a crayon get-up. Etc. Etc. Etc.} This is a tough age, because there is NO way he will do what I want him to do....Hummm....So I'm stumped. I know it will just come to me in one of those "out of no where" moments, but I'm ready for that to happen already. Momma's got work to do!

Thursday, September 15, 2011

Preston's Toddler Room: Mission Closet Organization

With all the recent changes in our lives, and rediscovering a new "normal" for Preston, my plans of redoing his space have morphed into an even more frantic mission. Call it a fresh start. Call it my way of focusing my energy on something I enjoy {or call it my way of ignoring my real feelings about everything going on}. Either way, it's FUN, and everyone knows I can't resist a good deal OR a home decor opportunity!

While the rest of the space is ALMOST ready for the big reveal, his closet IS ready for a coming out party! This is what I started with, but please ignore the fact that the closet door panels aren't painted. At eight months pregnant, it was the last task to do. Since it was hidden, I got lazy. Don't judge. Just find comfort in the fact that I'm not perfect folks!


I've always {always defined as since I was first "with child"} had my eye on these Land of Nod hanging closet storage systems...


Last week, I was cruising around Facebook and saw that Land of Nod was offering a free shipping code to fans. I took it as a sign from the Decor Gods that I had to have a few of them {and that's all the closet could fit anyway}, so I placed the order, and I couldn't be happier with the results!


The closet is small {just as wide as the door} but I think I did a pretty decent job with utilizing every square inch {always important in a two bedroom home}! I was able to fit his hamper inside and free up a little floor space in his bedroom too. His blankets were taken off the top shelf and folded neatly into the larger bin. His shoes were taken out of the old white plastic drawers and put into their own shoe organizer to the left {I know it's hard to see in the picture. Sorry!}. He already loves this feature, because he can reach them and easily find a pair now! The basket on the floor holds his sheets and keeps them organized {PWA is his initials, and a good friend of mine gave it to us for a shower gift}! There's just enough room left for his hanging clothes. They are organized by size using alternating hanger colors {blue for current size, then white for the next and blue for the next, etc.} It was my budget friendly alternative to those clothes size markers you see now, and it works well for us!

The red bins on the top shelf were a clearance find {$1 each}, and they hold his bath items and extras. The two on the right are labeled for learning games and art supplies, but they're currently pretty empty. I'm always planning ahead and making room for preschool activities {probably pretty natural for a former preschool teacher}. I also found red pencil boxes for $.50 each {gotta love Back to School clearance time}. Each red bin holds three pencil boxes. Each of those boxes hold different needed supplies like crayons, chalk, stamps and stickers, letter magnets, felt pieces and finger puppets, etc.


The labels are laminated scrapbook paper that I wrote on with a permanent marker. They are available for purchase in My Etsy Shop and can be customized to fit any space!

I hope this inspires you to clean a closet or two. Don't ignore the "closed door spaces" of your home, because every square inch does impact our mood. Plus, as I've always said, organization is the key to happiness. Extreme? Maybe, but organization is the basis of every decor project. Once you get a handle on the clutter, the rest will fall into place!