Showing posts with label birthday party. Show all posts

Friday, August 10, 2012

Toddler Construction Themed Party

My cousin Amanda just celebrated her son's 2nd birthday. Preston and I weren't able to make it, because it was in Michigan. I was already disappointed, but after I saw the pictures, I was downright sad we missed  it!

Preston and Eli are only about five months a part, and I know they'd be best friends if we still lived near them. We're one of those families where our cousins are more like our siblings, so living in Virginia sometimes wears on me.

Anyway, take a look at the fabulous job Amanda did...


Guests were greeted and introduced to the theme right away. You can buy inexpensive orange cones and caution tape at home improvement stores {like Lowe's}. Look closely at that wreath. It's wrapped in an extension cord. Genius!


I think it comes as no surprise that my favorite element on the food table are those toy dump trucks. I've never seen this done before, and it's simply perfection. It wouldn't even have to cost a cent if you already had a few hanging out in your child's toy box!


Eli's cake table is simple and fun too. Notice how she added interest by using a different color table cloth than the food table. She even saved money by making the cake herself, and the middle of the cake was yellow and chocolate caution stripes! Super cool.


Happy Birthday, Eli! We love YOU!


Thursday, August 2, 2012

My Mom's {51} Birthday Celebration

We recently celebrated my mom's birthday. While we kept it simple, I couldn't resist putting my little touch on the day. It's just in my nature, and I can't help myself!

As usual, I was on a budget, but it doesn't take a lot of money to sprinkle an intimate birthday dinner at home with a little fun. With very little effort {and funds}, a simple dinner can be transformed into a small celebration and make the guest of honor feel extra special.

My mom is one of those selfless souls who gives with no expectations in return. She's pure of heart and has always been such a patient parent, so she deserves for someone else to think of HER in return occasionally too!

While it doesn't take a lot of money, it also doesn't take a ton of time. Earlier in the day I had Preston color a handmade card for her. I just folded a piece of card stock in half, wrote a pretty little message with a marker and gave him crayons in matching colors. Then, I let him go wild!

She loved it, and it didn't cost a cent.

Afterward, we got ready to head over the mountain {literally} and through the woods {literally} to grandma's house...


But on the way, we had to made a quick stop...at Walmart.

I grabbed a prepackaged party set in purple and pink polka dots {6 plates, 6 napkins, 6 forks, 6 spoons, and 6 knives for $2.97}. I also bought a package of four cupcakes for $3.97. This was perfect since there were only going to be four of us {my parents, Preston and myself}. Then, I snatched a $1 box of white birthday candles, a package of $.97 purple tissue paper and a dozen pink roses {$9.97}.  We also took a moment to smell ALL the flowers, and I let the toddler make the final flower choice.

Once back in the car, I opened the flowers and wrapped them in the tissue paper quickly. This is a little trick I've done several times. In an instant the flowers look like they came from an upscale shop!

Check out how chic these Walmart cupcakes look with the chocolate curls. An untrained eye could never tell!


My dad made jerk chicken in the smoker, and he hauled the dining room table outside under a willow tree. We enjoyed the spread with an amazing view and good conversation. It was fabulous.


{Papa and Preston walking to the barn after dinner}


Happy Birthday, Mommy! Thank you for all that you do for Preston and I. It never goes unnoticed or taken for granted. We love you...


Crystal xoxo

Friday, May 4, 2012

Birthday Decor & What Started it ALL...

I joined the awesome network of creative online entrepreneurs when I opened my first Etsy shop in 2010. Then, I was known as PreschoolDoll Designs, and I made homemade crayon party favors and some educational products for preschoolers. The crayons were my biggest sellers {and what cost me countless all-nighters}...


The majority of my business came from children's birthday parties, and I began an instant love affair with party decor and design. My clients came to me with an array of ideas, and I found myself wanting to do more for them. {Of course, I've always loved all aspects of design, so it's often hard for me to just zero in on home decor specifically!} For whatever reason, I never actually pushed a party decor direction in my shop. I still don't in Modern Bungalow , but occasionally I get special order requests for party decor anyway!

My latest children's party request has been for a "UNO" themed first birthday party for a little boy named Alex! I actually did Alex's baby shower...


Needless to say, I am honored to be a part of Alex's UNO Birthday party too! Here's what I've thrown together so far. A door sign to greet guests and help introduce the theme...


Then, I went ahead and made a highchair bunting too...


I have one more project yet to do, but I had to share some {I'm doing a wedding currently too} of what I've been up to on the business front lately!

Happy Friday,

Crystal xoxo

Tuesday, April 3, 2012

"T" is for Tractor {and Two}

This post has been anticipated for awhile. Maybe so long that it's lost it's steam and excitement, but I'm going to put it out there anyway.
Waaayyyy back in February, my baby turned TWO. His current obsession is tractors, and he calls himself "tractor boy", so the theme for his party was pretty obvious!

I decided to go with what I'm calling a "Mod Tractor" theme, and I wanted to get big bang on a budget. I mixed vintage tractors {Johnny Poppers} with chevron and used lime green and school bus yellow accents. I'm also not a big fan of characters {Spider-Man and Batman, SpongeBob, etc}, so I limited the licensed John Deere accents too...
Because we don't have a TON of friends and family near by, I saved money and nixed invites. Everyone just got a text. LAME! I know, but I'm being honest...
I hope you're ready for a picture thick post, because here I go...


I happened to have a cake mix on hand, so I just bought some green frosting and some yellow stuffed Oreos. The idea was to make them look like tractor tires in grass. BIG fail, in my book, but they worked! I bought the yellow number "2" candle for $.60. The yellow and white striped cupcake liners were from  HeyYoYo on Etsy {the green paper straws were from her too}. She's one of my favorite party vendors! Tip: Always add another cupcake liner after baking, so you can see the vibrant colors!

I added height to the cupcake display by turning one of my white square bowls upside down, adding a green plate I had on hand and topping it off with my cupcake stand. I just cut a circle from a yellow and white paper chevron bag and layered it underneath. Not perfect, but you have to be resourceful, and it ALWAYS feels good to save some dough and use what you already have. Open up those cupboards and start playing!


I kept the menu easy and SIMPLE. I preordered a dozen "tractor tire" doughnuts from Walmart {$3.60}. Then, I picked the doughnuts up on party day and grabbed the rest of the supplies. We served up a fruit tray "Harvest" {$5.97 with dip}, a bag of cheddar popcorn "Johnny Popper Corn" {$3.00}, some mini cookies and cream cupcakes {12 for $3.50}, butterscotch candies "Sunshine" {$1/bag and 2 bags filled my apothecary jay}, some lemons and limes and a gallon of lemonade. I also ordered pizza and bread sticks and offered bottled water to anyone who didn't want lemonade. That was it, and it was just enough!


His friends all got to take home a package of tractor shaped sidewalk chalk. Aren't they too cute?! They were $5.75/6, and Christie was great to work with. She even made me a custom order of all green and yellow tractors for the party {each friend got one of each color}. I couldn't resist and just ordered Preston a set for his Easter basket, because mommy was trying to save money and only ordered enough for his friends for the party! Go check Sunshine and Sidewalks out for this summer!

I got the adorable DIY printable favor packaging from chickabug. She created the "Happy Birthday" banner too. I just printed, cut, strung and hung! Easy peasy, and there's no ship time with PDF printable files! I did add yellow Easter grass to all the favor bags. The grass was bought at a dollar store. Don't feel compeled to go all out in the favor department. Sometimes one really cute treat is WAY better than a zillion matchy-matchy, sugar-filled, designer buckets that cost way too much and were way too underappreciated!

I ordered those adorable paper tractors above {4/$3.00} from My Paper Pantry. They were really affordable, and she threw in an extra one! I just asked her to leave off the cupcake sticks, hand wrote on them and taped them to paper straws or that cool yellow chevron ribbon {$2.50} from Endless Inkabilities. These were first time purchases from both shops, and I was thrilled. GREAT customer service and fast delivery!

My Paper Pantry also made this larger tractor {$3.00} and added the number 2 at no cost...


I just hot glued it to this yellow 10" crepe paper fan {$1.92}.


The drink table cost next to nothing. The yellow plastic utensils, green dinner napkins, yellow dinner plates, green dessert plates and yellow cups were $1/package {the green table cloth on the food table was $1 too}. I used my grandma's vintage yellow and white plaid table runner underneath, my drink dispenser and a few other accessories I had on hand. That chevron ribbon and those cute little paper tractors were used over there too as "Tools" {silverware} and "Fuel" {lemonade}. I wrapped the silverware with the green napkins and some green twine I had on hand, and my mom happened to have the perfect straw holder already. She was gracious enough to let me borrow it.


Over at the gift/kids eating table, I tied some helium balloons to a toy tractor Preston already had.


The white tractor balloons were one of my favorite party finds, but they appear to be sold out now. I got the green and yellow "Happy 2nd Birthday" balloons from the same site {$.80/package}. The little white table and chair set was Preston's birthday gift from mommy. I got that at Pottery Barn Kids. Thank goodness for tax returns!


These streamer mobiles were the only real craft project I made for this party. I just bought two packages of crepe paper {one of each color} and two cross stitch hoops. I used the inside wooden hoops and tossed the outside hoops {the ones with the screws}. Then, I hot glued the streamers around the hoops and finished the tops off with the yellow chevron ribbon. Lastly, I hung them from my dining room light fixture with my green twine and trimmed the streamers to my desired length. Tip: If you decide to do this project, make them longer than you think you need and trim once hung.

I'll leave you with some party action shots. I'll warn you. I had a bit of fun playing around with Picnik.com


Note: I did do a 2nd Birthday photo shoot prior to the party. They had a tractor prop, so we snapped a few of my tractor boy, and I used some as party accents {one framed at the drink table and one collage hung on my dining room bulletin/chalk board behind the food table}. We went to Portrait Innovations. They were wonderful with Preston, affordable, and they print your pictures right there. No return pick-up trips! A HUGE plus for this mommy.

P.S.
I still don't have a working camera, so all of these party pictures were captured with my cell. That explains the less than blog perfect shots and poor quality, but that's where Picnik comes in handy. Did I mention I'm REALLY going to miss that site?!


This post has been linked to:

Addicted 2 Decorating


Crystal xoxo


Thursday, January 19, 2012

Someone's Turning TWO

The last 24 hours has brought a sudden blessing. While I cannot share details yet, I want you all to know that prayers may have been answered! God works in mysterious ways, and peace is on the horizon for us...

With the good energy flowing, I thought it was a perfect time to mention a very special birthday that's coming up! Preston's going to be TWO in less than a month {February 17th}, and we have a lot to celebrate this year!

Last year, I was a stay-at-home-mom and in a much different place, so I went ALL OUT with a "P" theme {Preston, polka dots, pails, popsicles, punch, popcorn, puzzle pieces, pretzels, pinwheels, peanuts, poms, pizza, etc}...


This year, I'm just not THAT organized, so I'm scaling things down a bit. I have decided on a tractor theme, because that's our current phase {and it still fits into my NO CHARACTER rule}. We're just inviting a few friends over for cupcakes and pizza, and then I'm taking him to the aquarium the next day. Low key, but budget chic! I've already bought cupcake liners and paper straws from HeyYoYo {one of my favorite Etsy shops}, and I have a few other details in the works. It should be a "Big Green" hit...


Tractor treat bag photo from chickabug.


Thursday, September 8, 2011

Pom Pom Tutorial

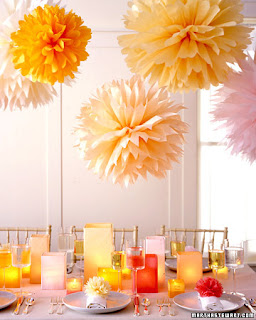
Recently a facebook fan asked me to post a pom pom tutorial. She was inspired by the poms that I had at Preston's Polka Dot Party...


These poms were somewhat costly on Etsy, but I still LOVE the look of them {even if they are a bit over done on the party diva scene}. As I'm always looking for budget friendly alternatives, I decided to research blog tutorials online. There were TONS, and the supplies are easy on the wallet too {especially if you purchase Dollar Store tissue paper}, so I got to work making my own! I've had the honor of hosting two events since then, and my handmade poms were always a hit!

For my friend Rosa's baby shower...

And most recently for my mom's 50th Birthday Celebration...
Unfortunately, I don't have the supplies on hand to do my own tutorial, and this fan needs the instructions QUICKLY, so I've decided to do a link party. I hope these fabulous tutorials help you along the way to pom production! {Click each picture or watch the video}

Hints:
Begin folding your poms ahead of time {each can take up to 15 minutes}, but do not open any of your poms until you are ready to hang them. Otherwise, they will smoosh!

Also, use floral wire to wrap around the middle of your tissue and secure it. Other items like pipe cleaner are too thick {in my opinion} and can hinder the unfolding process. Do not wrap the wire too tight, and remember to make a loop at the top to attach your hanging ribbon or fishing line.

Carefully unfold the tissue paper too, pull firmly but not too tight, and remember you can always fluff and adjust them when you're done! Email me with any additional question, and I will happily help!