I've been so excited to share this post with you, so I'm glad you found us today! As many of you know, I have been working hard transforming
Preston's Nursery into a "Big Boy" room. He is 19 months old and still in his crib, but his play has really evolved in recent months. I could tell he was growing bored with his set-up {and maybe I was too}, but I also sensed he was
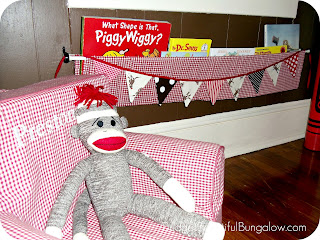
ready for something more exciting and age appropriate. The rest of the BIG reveal is coming soon {I promise}, but for right now...come on in and sit awhile. His DIY wall book bin is complete!
In early March of 2010, I saw this picture online...
I immediately saved the photo to my computer and put it away in my memory bank of "some day" tasks. Preston was less than a month old, and I really wasn't gung-ho on any major projects. Since then, I've seen it pop around
Pinterest, but I honestly have no idea who's original idea this is or where I saw it {
Project Nursery's gallery most likely}. If it was you (1) Job well done! (2) Please, let me know so I can give you credit!
Correction: A fabulous reader gave me the link to the original nursery post! This wonderful idea was
MB's!
So...how did I make this adorable little room moment?! I'll have to explain, because I didn't take any tutorial-type shots. I'm sorry, but be reassured that it wasn't too tricky or {most important} too expensive!!!!
It all began when I was trying to hem the red and white gingham curtains from his bedroom. I ended up cutting the wrong end off, so I had a small piece with the rod pocket. The curtains were ruined, since it was my final panel, and it would look different from the other three...I was mad. I got *a little* upset. I pouted. Then, a light bulb came on, and I remembered this project. The scrap fabric piece would be perfect, because I'd only have to sew a rod pocket into one end {I knew the project required two pockets for hanging}.
I went to the space I wanted it to go and measured. Then, I measured the width of the material. Again, the
decor gods were looking out for me, because it was a PERFECT fit! I did an extreme happy dance. Then, when I recovered, I got to work sewing.
I didn't follow any sewing rules with this job. I pretended like I knew what I was doing and went with it. First, I grabbed one of his larger books and laid the material out length wise in front of me. I folded it in half {to create the pocket you see on the wall} and laid the book inside to ensure it would have enough material to support it. It did, and I moved on {with building excitement}.
Because I had a finished, store bought curtain, the sides were already hemmed. I just had to create one rod pocket at the opposite end. I folded the material over and allowed for a two inch pocket. I sewed it across and was done.
If you have a raw piece of material, I recommend measuring your space to see how wide you need the finished book bin to be and allow for two inches of edge seams {one on each side of the finished book pocket}. Then, I would hem the right and left edges. Next, I would fold each of the opposite ends over, pin and sew a two inch rod pocket at each end. To simplify it, looking at your finished rectangle of material and going clock-wise, you should have a pocket at twelve o'clock, a finished hem at three o'clock, another pocket at six and a hem at nine. Maybe, that made it more confusing?! Darn it! I knew I should have taken pictures!!!!
Ok. After that, I went to
Lowe's and bought two of these wall mounting brackets.
They are in the curtain hardware section, come in black or silver finishes and are less than $5 a piece. I believe they're called cafe rod brackets. I also bought two skinny white tension rods {for less than $2 each}. I believe she used a wooden dowel in the original, but I knew that required cutting, so I kept things simple and used these. At first, I noticed a little bowing, but it doesn't bother me, and they seem to be holding up well. They've been up for two weeks or so and get daily use too! The last part can be the tricky part, but I did it by myself. Well, I did have a tiny helper who held my screwdriver and played around...
I just measured the finished pocket, allowed for some tension rod space and screwed the first bracket in.
Make sure you remember to decide where you want the mounted pocket to fall on the wall. We have wide baseboards, and I knew I didn't want the finished wall pocket to cover any of those! Also, I used a screwdriver, because I don't have my own drill yet {fingers crossed, Santa}, but I definitely think a drill would have been better!
Finally, I used my laser level and screwed the second bracket into place. I opened the tension rods to their needed length, tightened the first ends of the rods into the bracket, slide the pocket on, tightened the second ends of the tension rods into the bracket and stood back!
Of course, I couldn't leave it at that though! I HAD to add this adorable miniature
bunting from Etsy, but it added whimsy and interest and was the exact finishing touch it needed!
Blue Moon Studios was a JOY to work with and did a fantastic job on it too! It was well worth the $15 {and extra wait to post this}!
Preston seems pretty happy with it too...
Other products seen:
Personalized Red Gingham Soft Chair-
Pottery Barn Kids
Sock Monkey-
Target Stores
Personalized Sock Monkey Tattoo {pictured on it's arm}-
Etsy
White Stool-
Target Stores
Giant Red Crayon Bank-
Toys are Us
Sock Monkey Toddler Pillow-
Carousel Designs {babybedding.com}
This post has been linked to
At The Picket Fence: Inspiration Friday. Click the photo to join the FUN!


