Wednesday, November 21, 2012

Halloween Mantel {Better Late Than Never}

I'm currently on vacation from my day job and playing some serious catch-up on the blog front. I've also been working on new items for my Etsy shop and will be getting some new stuff listed soon! It's been awhile since I focused on my creative passions, and this little break has been a much needed refocus for my soul...
 
Anyway, I decided just to give you a quick glimpse at what the bungalow looked like this Halloween and some of the activities Preston and I did. I'm still using my phone for all of my photo needs, so bare with the horrible quality. Thank goodness for PicMonkey!


I used $1 items from my local grocery store in the garland. The gray netting was $1, and so were the set of four skeletons. I had the black ribbon on hand and reused my burlap Christmas garland from last year...


The black paper bats were from the Dollar Tree and so were the black rats and tomb stones. Everything else I gathered around the house. I probably could have made the bats, but the $1 in cost was worth the time savings for me!


Using vintage bottles, I wrapped the tops with jute and filled them with dried beans.


Instead of carving pumpkins this year, we just painted the few that we got at the pumpkin patch. Preston had a trip to Michigan with my parents right before Halloween, and my work schedule didn't allow for it. I was a little bummed not to carry on the carving tradition, but I've learned over the last year and a half that I can't do it all. I've had to let go of some things, and while I'm getting better at that every day, it's still a personal struggle.


He doesn't appear to be "missing out" any, so I must not be doing a half bad job!


Crystal xoxo


Tuesday, November 20, 2012

$13 Handmade Halloween Costume

I have finally nailed down a full time position at work. You're looking at the newest Appliance Sales Specialist at my Lowe's store, but I still need to live frugally! While my time is even more limited now, this year I decided to make Preston's Halloween costume again and save a little moolah.


Now, I love to craft and create, but I'm no seamstress. The idea for the Mr. Potato Head costume was sparked by my little spud himself. He's in a serious Toy Story phase, and I wanted him to be excited  about whatever he was going to be too. He's getting old enough now to be very well aware of what I put on his body. He has an opinion about it too of course, and we've already gotten in a few morning clothes disagreements! He wasn't thrilled with me here either though...


It took one trip to Walmart for material and felt, and I got started. I had no real plan in mind-just a blurry vision of what I wanted. First, I simply traced his body and cut out two potato shapes. Then, I measured straps and hand sewed them in place. Using styrofoam balls, I created the eyes by covering the balls with white fabric and adding felt details. The face pieces were made of felt and hot glued together and in place on the potato. I stuffed each face piece with scrap fabric to give a 3-D effect.


Lastly, I created a butt pocket on the back with left over brown fabric {whatever fabric I bought didn't fray, so I didn't have to hem the edges of the costume}. Then, I hand cut a few additional traditional extra pieces, from felt, and hot glued them in place. The Playskool logo was found online and printed on card stock. I hot glued that in place too, and it held up all night!


I ended up hand sewing a small side panel under each arm. This kept the costume in place on his body well. A white shirt, white mittens and black hat later, and the costume was complete! Total investment was just $13!


P.S. Thanks for reading and following along. This marks my 100th post!


Crystal xoxo


Monday, September 24, 2012

Little Projects Here and There

I've made little updates here and there around the house, so I thought I'd share some of those. This will be a picture happy post, but those at the best anyway. You guys don't want to read me ramble on and on about something that's self explanatory by a picture.


I've been slowly collecting milk glass for awhile now and recently put together this little dining room centerpiece. All three of these pieces were bought at my favorite local consignment shop for about $20 total.


This little vignette is a new addition to my bedroom. It's anchored by that awesome bamboo tray that I scored for $5 at Salvation Army. Here's what this spot looked like before...


 Pretty stellar improvement...if I do say so myself!


The office got a little update too. I purchased the new desk lamp at Walmart and picked up some baskets and the two bronze frames at Target. This space still needs some tweaking, but I need to live in it awhile before I decide exactly what that is. I'm not sure the blue desk is working or if it's the chair that's not or if I need to recover the bulletin board. Ahhhhhh......I'll figure it out!


Such a cozy spot to work at night. Don't cha think?!
 
 
I've also been working on some Halloween decor, so stay tuned for that! I'll leave you with a new picture of me. Sometimes it's nice to put a face with the blogger...


 Crystal xoxo


Tuesday, September 18, 2012

Address Canvas Art

It's been awhile since I got out some craft supplies and created something for myself, but I got the itch tonight!


I have an excess of 8x10 blank canvases {thanks to a stellar Michael's sale}. I also have tons of paints and permanent markers and a small collection of skeleton keys, but it's my Martha Stewart stencils that have been begging to come out and play...
 
 What I'm getting at is that this little project was FREE!
{and you already know I cannot get enough of that}
 
 
I measured out the middle of the canvas first. Next, I mixed my own shade of gray acrylic paint {with a dark gray and some white}, and stenciled away. Then, I wrote out my street name free hand with a green marker and went over it with a gray one to add a little detail and interest. Lastly, I glued a skeleton key in place.
 
{Voila}
 
Quick and super easy!
 
I happen to think it's pretty cute too, and the imperfections just add a little bit of charm. After all, this bungalow is anything but perfect. It's also kind of fitting that our front door lock is original and also a skeleton key hole...


Crystal xoxo

Friday, August 10, 2012

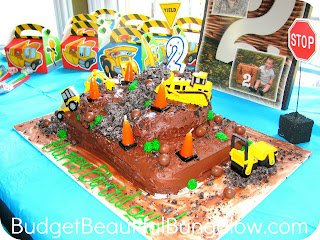
Toddler Construction Themed Party

My cousin Amanda just celebrated her son's 2nd birthday. Preston and I weren't able to make it, because it was in Michigan. I was already disappointed, but after I saw the pictures, I was downright sad we missed  it!

Preston and Eli are only about five months a part, and I know they'd be best friends if we still lived near them. We're one of those families where our cousins are more like our siblings, so living in Virginia sometimes wears on me.

Anyway, take a look at the fabulous job Amanda did...


Guests were greeted and introduced to the theme right away. You can buy inexpensive orange cones and caution tape at home improvement stores {like Lowe's}. Look closely at that wreath. It's wrapped in an extension cord. Genius!


I think it comes as no surprise that my favorite element on the food table are those toy dump trucks. I've never seen this done before, and it's simply perfection. It wouldn't even have to cost a cent if you already had a few hanging out in your child's toy box!


Eli's cake table is simple and fun too. Notice how she added interest by using a different color table cloth than the food table. She even saved money by making the cake herself, and the middle of the cake was yellow and chocolate caution stripes! Super cool.


Happy Birthday, Eli! We love YOU!


Thursday, August 9, 2012

No Sew Curtain Hems


One of the bungalow's biggest assets is it's tall ceilings and tall windows. They allow the entire house to feel so much larger than a two bedroom home, but with big windows and tall ceilings you get areas that need longer curtains. I cannot do typical 84 inch curtains, and this drives me crazy! They are simply more affordable and readily available at retailers in an array of fun fabrics, so I get frustrated. I'm stuck searching for 95 inch curtains on a barely there budget, and that's no easy task...

I only have one window in the living room, so I only needed two panels. That's the good news. The bad news is that every curtain I found and could afford didn't come in the longer length I needed. Finally, I settled on some plain white panels for $12.99 each at Target. They were 95 inches, but when I got them home and hung, they were even too short.


They also lacked the wow factor I look for in window treatments. I kicked around ideas of stenciling them and taping them off and painting stripes, but those projects just ended in a fail. In fact, I ruined one panel and had to go back to Target to replace it. I even tried hanging a new, more substantial rod one night that I scored for $2.97. Take a look at how that ended up...


I was starting to feel defeated. I put the original rod back in place and tucked the new one back into my closet.

After racking my brain and looking at the boring panels in dismay for weeks, a light bulb came on. I had plenty of fabric left over from my stool project. I originally bought two fabrics, because I couldn't decide in the store which to use. It was only $7.99 worth of fabric left {one yard}, but it would be enough!

Just in case you missed it, here's the little stool...


Anyway, I'm impatient. I also don't own an actual sewing machine of my own {I borrow my mom's when I desperately need to}, BUT you bet your booty I have the BEST tool known to resourceful DIYers....a hot glue gun! I think you know where I'm going with this...


Yep! I just measured and cut the fabric to length {leaving slack for hems}. Then, I figured out how wide I needed it to be, so the finished curtains would just brush the floor. After I had my measurements right, I folded the new fabric in half, folded both top edges in and secured with hot glue. This way I had a solid strip that was finished on both sides and all the way around. I basically just glued where I would have ran a sewing machine to accomplish a finished piece. Folding the fabric in half also gave the strip more weight, so it would hang better.

I also turned in the edges on both ends and secured with glue. For the last step, I just lined my finished strip up with the existing curtain hem and glued them on using the white curtain panel hem as a straight guide. It was really easy and only took about an hour to complete the entire project! Of course, I'll never be able to wash them, but I'm not really a wash the drapes kind of chick...


I'm really pleased with the entire outcome. Now, I just need to glue/sew/buy a throw pillow for the chair...


and the before again...


That same night I framed an awesome new piece of scrapbook paper for my gallery wall.
{$.50 update}


Who's busting out their hot glue gun tonight?!


Crystal xoxo


Thursday, August 2, 2012

My Mom's {51} Birthday Celebration

We recently celebrated my mom's birthday. While we kept it simple, I couldn't resist putting my little touch on the day. It's just in my nature, and I can't help myself!

As usual, I was on a budget, but it doesn't take a lot of money to sprinkle an intimate birthday dinner at home with a little fun. With very little effort {and funds}, a simple dinner can be transformed into a small celebration and make the guest of honor feel extra special.

My mom is one of those selfless souls who gives with no expectations in return. She's pure of heart and has always been such a patient parent, so she deserves for someone else to think of HER in return occasionally too!

While it doesn't take a lot of money, it also doesn't take a ton of time. Earlier in the day I had Preston color a handmade card for her. I just folded a piece of card stock in half, wrote a pretty little message with a marker and gave him crayons in matching colors. Then, I let him go wild!

She loved it, and it didn't cost a cent.

Afterward, we got ready to head over the mountain {literally} and through the woods {literally} to grandma's house...


But on the way, we had to made a quick stop...at Walmart.

I grabbed a prepackaged party set in purple and pink polka dots {6 plates, 6 napkins, 6 forks, 6 spoons, and 6 knives for $2.97}. I also bought a package of four cupcakes for $3.97. This was perfect since there were only going to be four of us {my parents, Preston and myself}. Then, I snatched a $1 box of white birthday candles, a package of $.97 purple tissue paper and a dozen pink roses {$9.97}.  We also took a moment to smell ALL the flowers, and I let the toddler make the final flower choice.

Once back in the car, I opened the flowers and wrapped them in the tissue paper quickly. This is a little trick I've done several times. In an instant the flowers look like they came from an upscale shop!

Check out how chic these Walmart cupcakes look with the chocolate curls. An untrained eye could never tell!


My dad made jerk chicken in the smoker, and he hauled the dining room table outside under a willow tree. We enjoyed the spread with an amazing view and good conversation. It was fabulous.


{Papa and Preston walking to the barn after dinner}


Happy Birthday, Mommy! Thank you for all that you do for Preston and I. It never goes unnoticed or taken for granted. We love you...


Crystal xoxo

Thursday, July 26, 2012

$3 Bedroom Update {Lamp Shade Project}

My master bedroom often looks more like a hotel room to me and less like a reflection of my personal style. It's almost too staged and too empty, and it just needs some pizazz! The other night, I decided to start the process of making it a little more unique, more me and less cookie cutter.

Since I do generally like the way the space looks, I wanted to ease myself into these changes, so the first one was quick and easy.


You might remember how my sconce shades looked before...


Plain.

I went to Walmart on a hunt for some extra wide bias tape and ended up scoring the perfect shade of blue. I bought two packages {less than $3 total} and went home. Please note: Bias tape is thicker than ribbon, not so slippery and easier to work with for a project like this.


I plugged in my trusty glue gun, unscrewed the shades and took a seat on my living room floor.

First, I put a bit of glue at the bottom of the shade's existing seam {the "back" of the shade that you would face toward the wall} and placed the blue bias tape where I wanted it along the bottom of the shade. I let the glue dry and pulled it snugly around the shade. Making sure it was straight and even was actually pretty easy, because I just followed the existing lines of the shade cover. I pulled it back to the seam, overlapped and secured with another dab of glue and trimmed the excess. I decided not to glue all the way around the shade, so if I ever want to remove the bias tape I can with no visible damage! The only glue spots are on the back.

Lastly, I just repeated at the top of the shade and did it again to the top and bottom of the next shade. The entire project took less than 20 minutes. Seriously. It was super quick and easy!

Here's another look...


Let's see another before and after


The subtle touches of blue really warm up the space. The two blue accent pillows were $4/ea clearance items from Lowe's, and the blue throw blanket was a $19 clearance buy at Target. I like how the new touches of blue on the bed pick up more of the blue from the existing bed skirt and pillow shams. Together they make the bed look more welcoming. I also like how the blue is balanced more evenly throughout the room by pairing it with the blue in the prints hanging near the window. Before there was too much brown and khaki. It made the room feel darker and heavier than I like.


I'll leave you with another pretty Instagram shot. Sweet dreams!


Crystal xoxo
Wednesday, July 25, 2012

The End of the Road {trip}

I've been a little MIA lately {here and on Facebook}, and I'm sorry. As usual, life has gotten away from me, and I feel like I've been in a constant state of RUSHING. I am most definitely ruled by the clock, but I'm sure all working mommies feel this way.

Between being a single parent, my day job {but it's mostly an evening job}, filling Etsy orders, cleaning the house, paying bills, yard work, yada yada yada, I don't have much time for blogging-let alone time to create the projects to actually blog about.

Most days, I feel accomplished if I get the dishes washed {no dishwasher} and Preston dressed before I have to leave for work. Then, there's the 40 minute drive to work! That drive is usually the only break I get all day though, so I'm kinda grateful for it. Life was a lot different when I knew there would be an extra set of hands coming through the door at five pm to take on some of the stress and duties. Jeez! Back then, my biggest daily worry was what to make for dinner...

On top of that, my divorce should be final in the next month, and I guess I've been in a bit of a funk. I might even call it a slight depression. It's so hard to describe my exact feelings about it all, but I promised when I shared the initial news that I was going to be as honest {blunt} as possible about this process.

I will be relieved to finally be legally free from the person who has hurt me beyond belief. I don't miss him in any way. He made that part easy. I also refused to ever waste a moment pining over someone who obviously never really loved me in the first place. I'll also add that isn't an issue either, because in order for me to tell him our marriage was over I knew there was no chance of reconciliation. At that point, there was nothing left inside me for him.

It's honestly just a mix of emotions as this year from hell comes to an end.

On one hand, I'm very proud of myself for making it through, in one piece, and having a happy and well adjusting child to show for it. On the other hand, I'm exhausted from carrying the burden of it all on my own and trying to scramble to figure out how I was going to maintain our lifestyle on one income. We've settled in, and I'm finally accepting that this is how our life is going to be from here on out. Am I exactly where I'd hoped I would be at this point? No way, but I'm slowly accepting that's alright too. One day at a time. One day at a time. Say it with me!

One day at a time.

I'm mostly sad for my son. He really is going to be a statistic and come from a broken home. His "daddy" moved out of state almost eight months ago, and he hasn't seen him since. Preston's dad has almost been out of our lives for HALF of his little life. He will have no memories of him soon, and that breaks my heart. I worry a lot about the years to come. Those years where understanding truly takes shape and the questions begin. I role play in my mind and wonder exactly what I'll say to that curious little face. I so desperately want to shield him from as much heartbreak as possible.

Today, his dad sent him a package in the mail. It probably was about time since he never got a birthday gift or anything for Easter, and Preston was ecstatic to open the box and play with his new trucks. I stood back and smiled, and then it occurred to me. He's TWO. Soon, a package in the mail won't be enough to fill the massive void his father's absence will cause. The saying is true.

You can't buy love...


I took this photo on a recent family day trip to Jefferson, South Carolina, and I edited it in Instagram. It's given me a lot of comfort lately.

Here's a few more images from that trip.


Aren't those tubs awesome? It was just a graveyard of claw foots in front {and beside} of an old house alongside the road. There must have been hundreds of them. I freaked and made my dad pull over so I could capture it.


We went to one of the most delightful stores I've ever seen downtown. The store was jam packed with vintage toys, and the shop keeper let us touch and play with everything. It was fun to take a walk down memory lane.


This little roadside gem was literally inches from the winding mountain road. I scored a medicine cabinet for just $5 here. Look for that, if I ever get the bathroom done!


I'll leave you with a picture of Preston. Papa came out of a gas station with this little surprise. It probably wasn't the best idea to have his first push pop strapped in the backseat! He loved it though...


Crystal xoxo